Configure Distribution Service between two Secure GoldenGate Microservices Architectures
Once you configure an Oracle GoldenGate Microservices environment to be secure behind the Nginx reverse proxy, the next thing you have to do is tackle how to connect one environment to the other using the Distribution Server. In using the Distribution Server, you will be creating what is called a Distribution Path.
Distribution Paths are configured routes that are used to move the trail files from one environment to the next. In Oracle GoldenGate Microservices, this is done using Secure WebSockets (wss). There are other protocols that you can use, but for the purpose of this post it will only focus on “wss”.
There are multiple ways of creating a Distribution Path:
1. HTML5 pages (Distribution Server)
2. AdminClient (command line)
3. REST API (devops)
Although there are multiple ways of creating a Distribution Path, the one thing that none of these approaches tackle is how to ensure security between the two environments. In order for the environments to talk with each other, you have to enable the distribution service to talk between the reverse proxies. In this post, you will look at how to do this for a uni-directional setup.
Copying Certificate
The first step in configuring a secure distribution path, you have to copy the certificate from the target reverse proxy. The following steps are how this can be done:
1. Test connection to the target environment
$ openssl s_client -connect <ip_address>:<port>
This would look something like this:
$ openssl s_client -connect 172.20.0.4:443
The output would be the contents of the self-signed certs used by the reverse proxy.
2. Copy the self-signed certificate used by the reverse proxy (ogg.pem) to the source machine. Since I’m using Docker containers, I’m just coping the ogg.pem file to the volume I have defined and shared between both containers. You would have to use what is specific to your environment.
$ sudo cp /etc/nginx/ogg.pem /opt/app/oracle/gg_deployments/ogg.pem
After coping the ogg.pem files from my target container to my shared volume, I can see that the file is there:
$ ls
Atlanta Boston Frankfurt ServiceManager node2 ogg.pem
Change the owner of the ogg.pem file from root to oracle.
$ chown oracle:install ogg.pem
3. Next, you have to identify the wallet for the Distribution Service that is needed. In my configuration, I’ll be using a deployment called Atlanta. To make this post a bit simpler, I have already written about identifying the wallets in this post (here).
Once the wallet has been identified, copy the ogg.pem file into the wallet as a trusted certificate.
$ $OGG_HOME/bin/orapki wallet add -wallet /opt/app/oracle/gg_deployments/Atlanta/etc/ssl/distroclient -trusted_cert -cert /opt/app/oracle/gg_deployments/ogg.pem -pwd ********
Oracle PKI Tool Release 19.0.0.0.0 - Production
Version 19.1.0.0.0Copyright (c) 2004, 2018, Oracle and/or its affiliates. All rights reserved.
Operation is successfully completed.
After the certificate has been imported into wallet, verify the addition by displaying the wallet. The certificate should have been added as a trusted cert.
$ $OGG_HOME/bin/orapki wallet display -wallet /opt/app/oracle/gg_deployments/Atlanta/etc/ssl/distroclient -pwd *********
Oracle PKI Tool Release 19.0.0.0.0 - Production
Version 19.1.0.0.0
Copyright (c) 2004, 2018, Oracle and/or its affiliates. All rights reserved.
Requested Certificates:
User Certificates:
Subject: CN=distroclient,L=Atlanta,ST=GA,C=US
Trusted Certificates:
Subject: [email protected],CN=localhost.localdomain,OU=SomeOrganizationalUnit,O=SomeOrganization,L=SomeCity,ST=SomeState,C=--
Subject: CN=Bobby,OU=GoldenGate,O=Oracle,L=Atlanta,ST=GA,C=US
[oracle@gg19c gg_deployments]$
4. To ensure communication between nodes, the /etc/hosts file needs to be updated with the public IP address and FQDN. Since this is going between docker containers, the FQDN that I have to use is localhost.localdomain. This can be easily identified in the previous step based on the certificate that was imported.
$ sudo vi /etc/hosts
5. Restart the Deployment. After the deployment restarts, then restart the ServiceManager. Both restart processes can be done from the ServiceManager Overview page under Deployments. This will not effect any running extracts/replicats.

Creating Protocol User
After restarting the Deployment and ServiceManager, you are now in a position where you have to create what is termed as a “protocol user”. Protocol users are users that one environment uses to connect to the other environment. To create your “protocol user” is just the same as creating an Administrator account; however, this user is created within the deployment that you want to connect too. This “protocol user” will be able to connect Receiver Service within the deployment.
Most “protocol users” would be of the Administrator Role within the deployment where they are built. To create a “protocol user” perform the following steps on the target deployment.
1. Login to the deployment as either the Security Role user or as an Administrator Role user
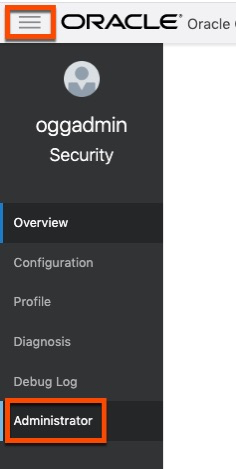
2. Open the context menu and select the Administrator option
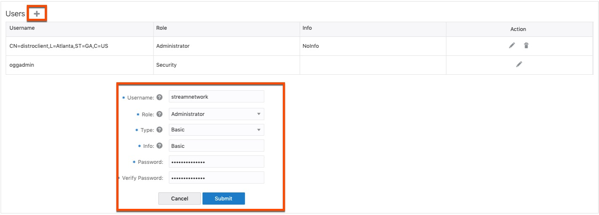
3. Click the plus ( + ) sign to add a new administrator user. Notice that I’m using a name of “stream network”. This is only what I decided to use, you can use anything you like. When providing all the required information, click Submit to create the user.
Add Protocol User to Source Credential Store
On the source host, the same “protocol user” needs to be added to the credential store of the deployment. This credential will be used to login to the target deployment for access to the Receiver Service.
1. Login to the Administration Service for the source deployment as the Security Role or an Administrator Role.
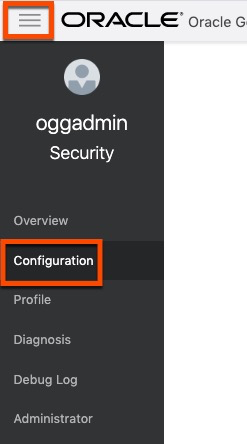
2. Open the context menu and select Configuration
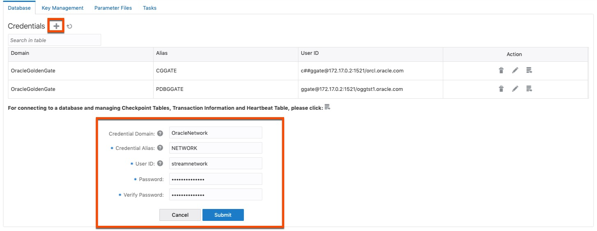
3. On the Credentials page, click the plus (+) sign to add another credential. This time you will be adding the “protocol user” to the credential store. Provide the details needed for the credential then click Submit to create the credential.
Build Distribution Path
With the certificate copied and credential created, we can now build the distribution path between the secure deployments.
1. Open the Distribution Service and the source deployment In this example, you already see a path created. This from a previous test setup. The next path will be right in-line with this one.

2. Click the plus (+) sign to begin the Distribution Path wizard.

3. Fill in the required information for the Distribution Path. I have highlighted the basics that need to be filled in. Noticed I select the “Reverse proxy enabled” and “Use Basic Authentication”. This will all you to configure the distribution path through the Nginx reverse proxy. When ready click either Create or Create and Run button.
Note: Although I’m using an IP Address in the image, you really need to use the FQDN for the target host
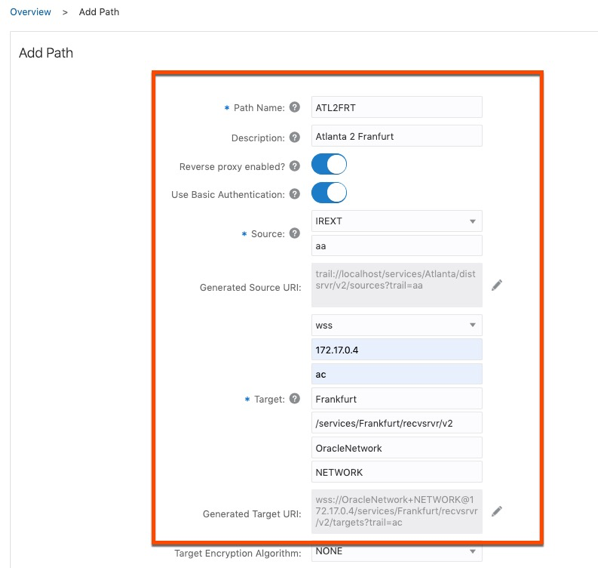
4. If everything worked correctly, you should now have a working distribution path between the source environment and the target environment. Notice that the port number being used is 443. This means that the communication is happening over/through the Nginx Reverse Proxy.

Now that I have a secure distribution path between the source and target systems, I can now ship trail files in a secure manner.
Enjoy!!!
twitter: @dbasolved
Current Oracle Certs

Bobby Curtis

I’m Bobby Curtis and I’m just your normal average guy who has been working in the technology field for awhile (started when I was 18 with the US Army). The goal of this blog has changed a bit over the years. Initially, it was a general blog where I wrote thoughts down. Then it changed to focus on the Oracle Database, Oracle Enterprise Manager, and eventually Oracle GoldenGate.
If you want to follow me on a more timely manner, I can be followed on twitter at @dbasolved or on LinkedIn under “Bobby Curtis MBA”.
